
1. Uses of Arrival Windows
CSR/Dispatch Usage (Shown in Blue):
Arrival Windows are used when CSRs or Dispatch place bookings on routes. They automatically are placed within an arrival window, based on the appointment. The arrival window selected for each appointment is the one whose start time is before the appointment time, and whose end time is after the appointment time.
Here are some examples. If your franchise's arrival windows are 10:00-1:00 and 12:00-3:00, then
- an appointment at 10:30 would have an arrival window of 10-1,
- an appointment at 11:59 would have an arrival window of 10-1,
- an appointment at 12:00 would have an arrival window of 12-3,
- an appointment at 12:15 would have an arrival window of 12-3,
- an appointment at 2:59 would have an arrival window of 12-3,
- an appointment at 3:00 would give an error, and would not fit in the 12-3 window.
CSR Arrival Windows are required in order to place jobs on the schedule. Every job placed by a CSR must be placed within the start and end times of an arrival window.
Also remember to Save Changes after any edits are made!
Online Reservation Usage (Shown in Orange):
Online Arrival Windows are used in the Online Scheduler. Customers who use the Advanced Online Scheduler, Simplified Booking or any of the 2021 online reservation modes (except the simple form no online mode) may select arrival windows from the list of times defined here.
If Transactional Emails are in use, then they are sent for both CSR and Online Arrival Windows. After the booking's confirmation status is changed from None to something else, a confirmation email will then be sent through Campaign Monitor to the customer, which will include the arrival window selected by the CSR.
Confirmation Texts:
Arrival Windows are used in Confirmation Texts.
2. Modifying Time Windows
2.1. Add an Arrival Window
- To Add an Arrival Window, click the Plus button.
- A blank Arrival Window will be placed at the bottom of the screen. The new arrival window may then be edited.

2.2. Edit Arrival Window/Assign Departments

2.2.1. Edit Departments
Each Arrival Window may apply to one, two, or any number of Departments.
Each Department has its own set of applicable arrival windows, that are defined here.
Note that for an arrival window to work, it must have at least one Department associated with it.
2.2.1.1. Assign Department to Window
To place a Department on a desired Arrival Window, simply drag it until it falls under the Departments column. The Department will stay put, and will then apply to that Arrival Window.

Multiple Departments may be applied to each Arrival Window.

2.2.1.2. Change Department Type (CSR/Online)
Left click to change the Type. Continue clicking until the desired state is reached.
Blue means that the Department on the applicable Arrival Window will only apply for CSRs. Orange means it will only be available Online. If it the Department box is blue and orange, it will apply to both.

2.2.1.3. Delete Department from Window
To Delete a Department, right click on it.

It will then be deleted.

2.2.2. Edit Start Time and Duration
First click on one of the rows.

Options to edit will expand after clicking.
- Edit the Start Time using the blue arrows or typing the time in.
- Edit the Duration of the Arrival Window. This is in minutes. The End Time of the Arrival window is automatically calculated from the Duration.
- When you are finished, you may click on another row for editing or hit save.

2.3. Delete Arrival Windows
2.3.1. Delete Arrival Window(s)
To Delete an Arrival Window, simply click its corresponding trash icon.

The row will be removed. Click Save Changes to make the deletion permanent.
If you deleted the wrong row, you can refresh the page before saving to get it back.

2.3.2. Delete All Arrival Windows
You have the option of deleting all arrival windows at once. You can also delete all the department assignments.
To do either of these, click the Delete Arrival Windows button.

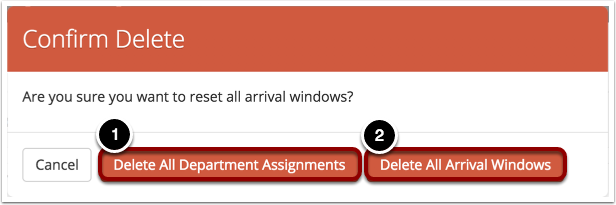
A popup will then appear.
- Delete All Department Assignments. This will remove all the departments from the arrival windows, but leave the arrival windows as they are.
- Delete All Windows. This will delete all arrival window settings so you can start again with a clean slate.
2.3.2.1. Delete All Department Assignments
All the department assignments will be cleared.
Click Save Changes to save the deleted departments. If you want to reset the department assignments, refresh the page.

2.3.2.2. Delete All Windows
All the arrival windows will be cleared.
Click Save Changes to save the deleted arrival windows. If you want to reset the arrival windows, refresh the page.

Comments
0 comments
Please sign in to leave a comment.