
Effective appointment confirmations are crucial for any business using Zr Ware™. They help reduce no-shows, optimize service routes, and significantly enhance the overall customer experience. Zr Ware™ provides a comprehensive suite of tools to manage confirmations, including manual phone calls, automated and manual text messages (SMS), and detailed email confirmations with calendar integration. This article will guide you through each method, administrative setup, and best practices for optimizing your confirmation workflow.
Table of Contents
- Manually Updating Appointment Confirmation Status
- Text Message (SMS) Confirmations
- Email Confirmations
- Admin Setup & Configuration
- Optimizing Your Confirmation Workflow (Best Practices)
1. Manually Updating Appointment Confirmation Status
The "Change Confirmation Status" window in Zr Ware™ is a versatile tool primarily used by Customer Service Representatives (CSRs) and Dispatch to update an appointment's confirmation status. This is essential after any direct communication with a client, whether it's an outbound phone call, an inbound call from the customer, or a customer's direct text message confirming their appointment.
1.1. Accessing the Confirmation Status Window
You can access the "Change Confirmation Status" window from several key locations within Zr Ware™:
-
From the Route Panel:
- Open the schedule from the route panel.
- Click the lock icon on the specific appointment you wish to confirm.
-
From the Appointment Panel:
- Click the Appointment icon.
- Click the red lock icon next to the relevant appointment.
-
From the Schedule Overview Page:
- Click the Schedule Overview button.
- Click on the lock icon on each job listing.
-
From the Green Phone Icon
- Click on the Green phone icon.
- Click on "Confirm Appointment".
- Search for the client by phone or name.
- Check the radio button next to the clients appointment date.
- Click "Select Appointment".
- From the Client History > Action drop down.
- Go to the Clients page.
- Click on Client History.
- Find the Upcoming Appointment.
- Click on the Actions drop down.
- Click on "Confirm Booking".
In all five methods, the "Change Confirmation Status" window will appear. This screen conveniently displays all the information you need to discuss the appointment with the client or verify their confirmation:
- Current Confirmation Status
- Morning Reminders (Click the "Add" text to add morning reminders)
- Client Comments (Click below in the "Note" section to add a client comment)
- Client name and phone number
- Appointment Date and Arrival Window
- Client address
1.2. Updating Confirmation Status
Once you have received confirmation from the client (via phone, text, or other direct means), or if you need to update their status for another reason, select the correct confirmation status from the dropdown menu in the "Change Confirmation Status" window.
Note: The "Auto Dialed" status is currently not available but will be implemented in the future, with usage determined by your management.
Click Update. The red lock icon on the appointment will now be replaced with an icon corresponding to the newly selected confirmation status.
2. Text Message (SMS) Confirmations
Zr Ware™ offers robust functionality for sending confirmation messages via text, streamlining communication and improving customer satisfaction.
2.1. Understanding Transactional Texts & Opt-In/Opt-Out
Confirmation texts are classified as Transactional Texts.
2.2. Client Opt-In/Opt-Out Management
While clients are automatically opted in, they can be opted out if they specifically request it or reply with specific words to your messages (Example: "Stop" if your base is using Podium).
There are a few ways to check on or update the opt-in/opt-out status of numbers (Reminder, transactional opt ins require the customer to explicitly reply to your text with a key word to opt themselves back in. Usually that word is "Start"):
- From the Client Screen when viewing it or editing it.
- From the Booking Screen, for either an existing or a new service contact.
- You can also do this from your texting providers application.
2.2. Sending Confirmation Text Messages
Confirmation texts can be sent to individual contacts or in bulk for all unconfirmed bookings on a given day. The system will attempt to send the message to all opted-in phone numbers associated with the service contact.
2.2.1. Sending Individually
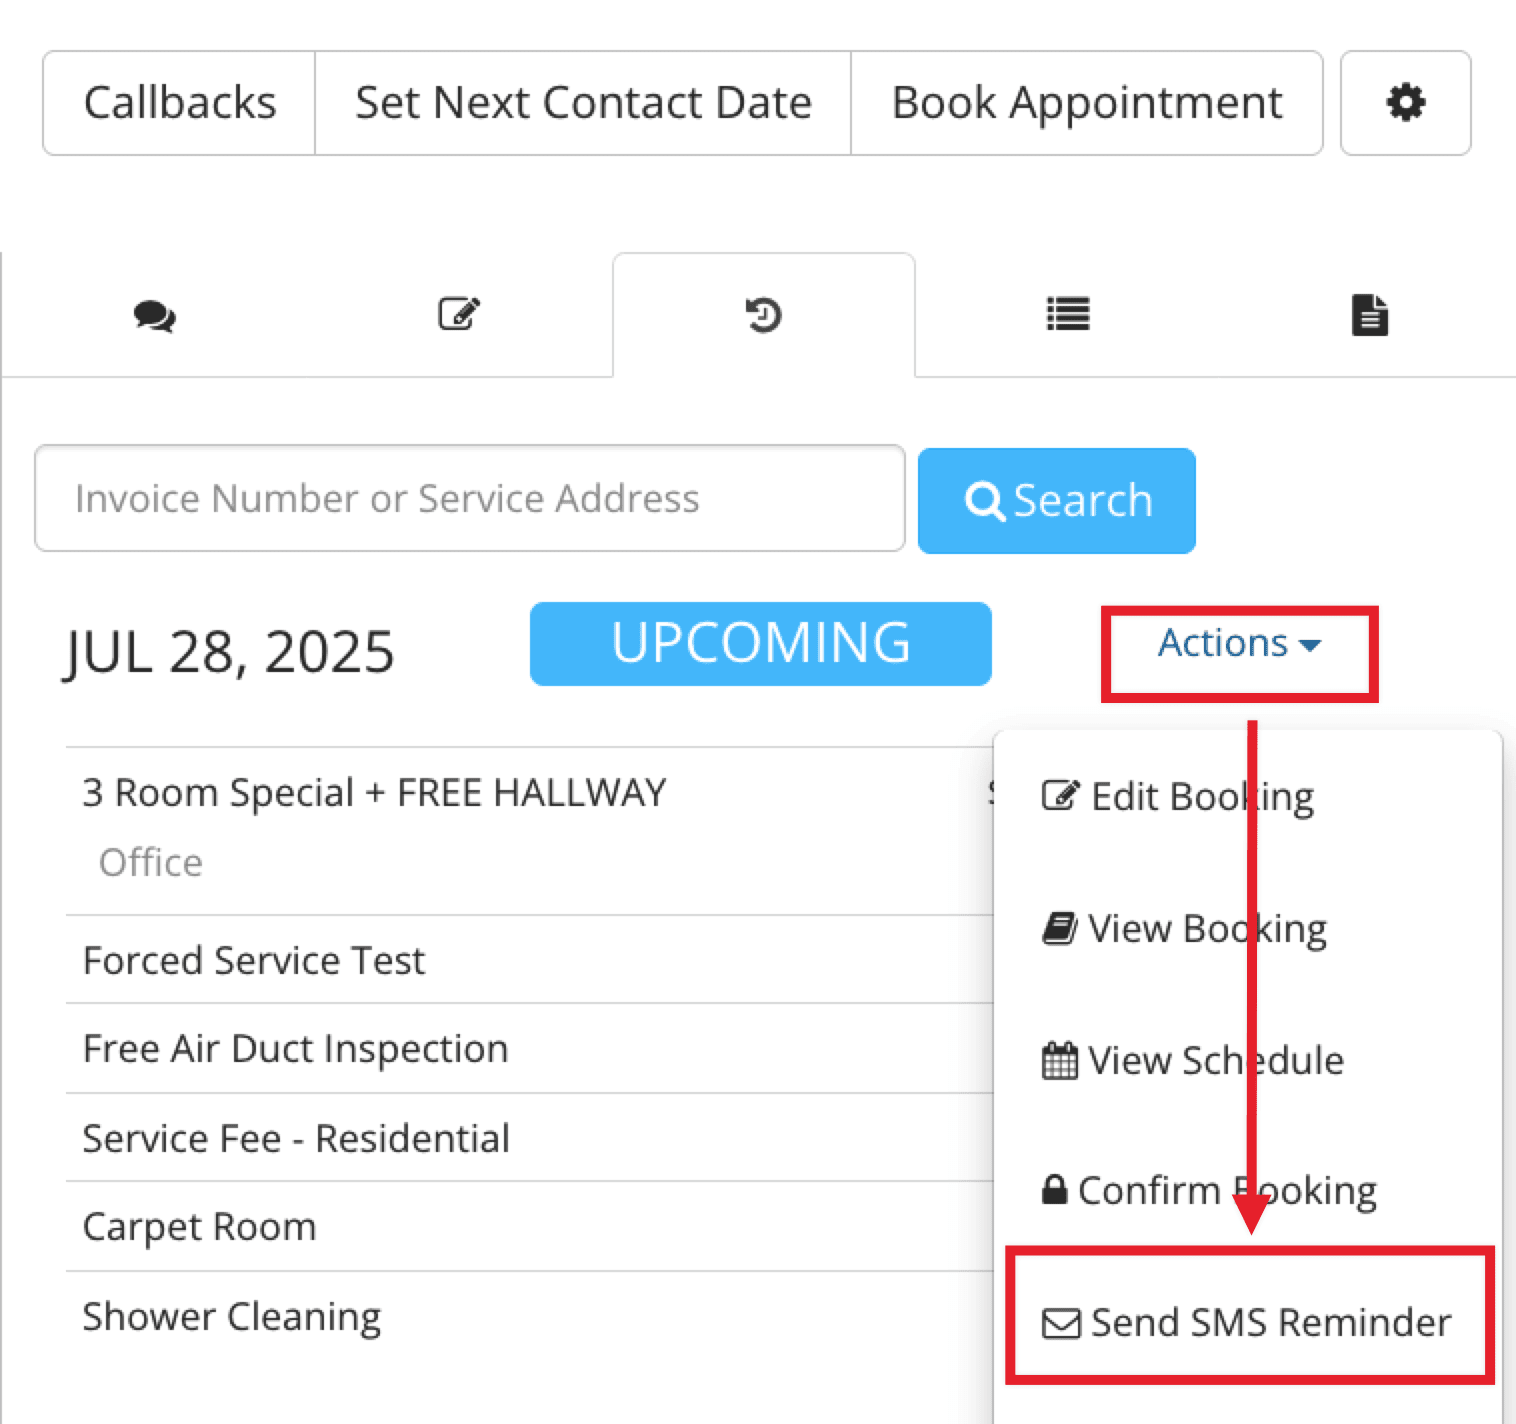
To send SMS messages to a single contact, click the "Send SMS Reminder" button on the Actions Menu from one of the following screens:
- Client Screen
- Map View Screen (on the Card View)
2.2.2. Sending Bulk Confirmation Texts
To send confirmation texts to all unconfirmed bookings for a specific day, use the new tab on the Map View.
Important Note: Using this feature again will not resend messages to already confirmed bookings unless their job time has changed since the first message was sent. You must have the "Send Bulk Text Messages" permission to utilize this feature.
Crucial Requirement: The Bell icon must be present next to a phone number for messages to be sent using either method (individual or bulk). If it does not appear, then one of the contact's phone numbers is not opted in to text messaging. At least one phone number for the Service Contact on a Booking must be opted in for the contact to receive a confirmation text.
2.3. What Confirmation Messages Look Like to Customers
Confirmation messages are configured in Admin > Message Center, allowing for customization of their content. Confirmation messages usually contain the customer's name, address, arrival window, and a confirmation link. They will appear to the customer as follows:
2.3.1. Customer Confirmation Page & Link Expiry
When customers follow the link in the confirmation text message, they are taken to a confirmation page that typically states their appointment is confirmed. Example of a Successful Confirmation Page:
However, if the customer's appointment time changed before they confirmed the appointment, they will be informed that their link has expired. Example of an Expired Link Page:
2.4. Direct Texting with Customers via Texting Provider (Podium)
Yes, you can text the customer directly! When a confirmation text is sent to the customer, a thread is automatically created in your texting provider's application. If the customer responds to a text, their response will appear in the texting provider's application, and you can reply to them there.
Important: Notifications for replies to text messages do not appear directly in Zr Ware®.
2.6. Understanding SMS Bell Colors
Bell icons appear in several places in Zr Ware™ and provide quick visual cues regarding SMS message status.
- Linking Bells (Always Blue): Some bells, like those in reports or on the client screen, are always blue. They serve as a direct link to the text conversation in Podium, allowing you to quickly access and text the customer.
-
Status Report Bells (Colored): Unlike linking bells, colored bells indicate the status of the most recent Confirmation Text Message that has been sent to the customer for a specific booking.
- Gray: No confirmation text has been sent for this booking.
- Blue: A confirmation text has been successfully sent for this booking.
- Green: The customer followed the confirmation link, and the booking was successfully confirmed.
- Red: There was an error sending the text for some reason. [Insert Screenshot: Map View or similar screen showing various colored bell icons (gray, blue, green, red) for different appointments]
3. Email Confirmations
Beyond calls and texts, Zr Ware™ supports email confirmations, offering an additional avenue for client communication and convenience, especially with calendar integration.
3.1. Booking Confirmation Emails & ICS File Attachment
All Booking Confirmation Emails sent out by Campaign Monitor or the default mailing system will automatically include an .ics file attachment. This file allows the customer to easily download and add the appointment dates to their personal digital calendars (e.g., Outlook, Google Calendar).
The name of this attachment will use your Organization name, for example: "Your [organizationName] Appointment.ics".
You can choose whether or not to include the arrival window in these calendar events via a setting in:
-
Admin > Company > 'Include arrival windows in calendar events'
3.2. Add to Calendar Feature (Campaign Monitor Integration)
The "Add to Calendar" button often seen in booking confirmation emails comes from a template created in Campaign Monitor. This template is connected to Zr Ware™ through:
- Admin > Campaign Monitor
For this button to function correctly, it must have the specific token [CalendarEventURL] placed in the "Button link" input within your Campaign Monitor template.
The [CalendarEventURL] token intelligently adapts based on the customer's email provider:
- If the customer is using Gmail, it will generate a URL specifically for Gmail's calendar.
- If they are using Outlook, Hotmail, Live, Yahoo, etc., it will provide a URL specifically for that format.
- For all other email clients, the "Add to Calendar" button will link to a URL that prompts Zr Ware® to dynamically create the .ics file on demand and return it to the customer's browser for download.
Appointment Status Specific Messages:
- If the appointment was "cancelled" before the customer clicks the link, they will be directed to a "Your appointment is cancelled" screen.
- If the appointment is already "completed," the customer will be presented with a different screen indicating that status.
4. Admin Setup & Configuration
Proper configuration in the Admin section is essential to leverage Zr Ware™'s full confirmation capabilities.
4.1. Enabling Confirmation Texts
To enable the automatic sending of Confirmation Texts, your administrators will need to configure these settings:
- Go to Admin → Texting
- Review the "Enable Text Messages to be sent to customers".
4.2. Configuring Confirmation Content
The specific content and appearance of your Confirmation text messages are customizable:
- These messages are configured in Admin > Message Center
4.3. Including Arrival Windows in Calendar Events
To control whether the arrival window is attached with the .ics file in your Booking Confirmation Emails:
- Go to Admin > Company > 'Include arrival windows in calendar events'
4.4. Campaign Monitor Integration Setup
To connect your Campaign Monitor templates for email confirmations and utilize features like the "Add to Calendar" button:
- Go to Admin > Campaign Monitor
5. Optimizing Your Confirmation Workflow (Best Practices)
Implementing strategic confirmation practices can significantly boost your confirmation rates, reduce cancellations, and improve operational efficiency.
5.1. Strategic Confirmation Timelines
- Standard Practice: It's common and effective for businesses to send initial text confirmation notices two days before an appointment (e.g., Monday morning for a Wednesday appointment). For customers who have opted out of text messages, phone confirmations should typically be made on the same schedule to ensure timely communication.
5.2. Implementing a Double Texting Strategy (Highly Recommended)
For customers who have not confirmed the initial text, implementing a second, follow-up text is a highly recommended strategy. A gentle reminder like "Hey, looks like you haven’t confirmed your appointment yet..." significantly boosts confirmation rates. This proactive approach has proven highly effective in reducing cancellation rates and minimizing the need for manual phone calls.
5.3. Staffing & Capacity Considerations
- Optimizing CSR Time: During busy seasons or when short-staffed, consider making confirmation calls for Monday and Tuesday appointments on Saturdays. This allows your Customer Service Representatives (CSRs) to dedicate Monday and Tuesday to managing higher volumes of inbound bookings and other customer service needs.
5.4. Proactive Confirmations for Full Routes
- If your service routes are filling quickly two or more days out, send confirmations for those appointments earlier than your standard timeline. This ensures maximum utilization of your resources, helps solidify bookings, and further reduces the likelihood of last-minute cancellations, allowing you to react quickly to any newly opened slots.
5.5. Real-World Example: Zerorez Omaha's Success
Zerorez Omaha exemplifies a highly effective, text-message-driven confirmation strategy that has nearly eliminated the need for manual phone calls:
- Automated First Touch: They send initial text confirmations at least one day prior to the appointment, consistently at 8 AM.
- Automated Follow-Up: If the initial text is not confirmed by the customer, an automated follow-up text is sent, reinforcing the need to confirm.
- Reduced Call Volume: This streamlined process has drastically cut down their manual confirmation call volume. When calls are necessary, they are typically made late in the afternoon, only for truly unconfirmed appointments.
- Proactive for Full Routes: For routes that are full two days out, they send confirmations at the same time as their one-day-out confirmations, following the same successful automated process.
- Result: At the time this strategy was documented, Zerorez Omaha maintained an impressive 10% cancellation rate, highlighting the effectiveness of their automated confirmation strategy.
Acknowledgments
We extend our sincere thanks to Rochelle Weather for her valuable insights and contributions to the "Best Practices" section of this report documentation.
Comments
0 comments
Article is closed for comments.